Showing posts with label 12 Days of Christmas Tags. Show all posts

Monday, January 2, 2012

Day 12 - Plus One

Before I could get started on the next projects, I had to clean up a bit and found the background tissue paper background - so I thought, what the hey, I'll just do one more tag, and here it is. 


Aside from the amazingly cute kitty, I actually like a lot about this tag. I didn't have the die cuts for the houses, so I just made one out of grunge board. How amazing is that stuff?  Oh, I could go on for several paragraphs, but I digress.... I loved how it did exactly what Tim said it would. I painted it with two coats - it really is so much better to do 2 light coats instead of one thick one....sanded it and then used walnut stain ink. The stickles are like magic with the paint over top of them; it looks very beach-y to me.

I like the foil lace, but it's a bit tricky. One must have patience which we know is not my most strongest suit. However I hung in there and was happy I did. I love how you get bonus lace from the die cut!! The tissue paper flower worked and then I had this old silver plastic stuff that has literally been kicking around for years - but I think it's perfect on this tag.


And just one more picture of the cute kitty. Reminds me of one of our cats - Ben, right after he's done something he knows is bad. He's so dang cute, I can hardle be mad at him....

Next project: A Valentine's Album for Stamp Cache.

Saturday, December 31, 2011

Day 12 - The Last Day of Christmas Tag

Tim's tag was all about tricks with tissue paper. By the time I got around to working on this it was December 30 and I have to admit my thoughts had wandered a bit towards Valentines Day.


I had a couple of happy accents in the making of the tag. I used Glossy Accents to adhere the tissue paper to the tag which had already been stamped and colored with Fired Brick stain, with a cover coat of Picket Fence stain. I didn't bother to spread the adhesive so I ended up with some of the tissue being right down on the surface of the tag, and some was raised a bit as I scrunched the tissue paper up. So I got kind of a cool splothcy effect in the background. (So many technical terms in use tonight).

I colored some sparkly tule with more Fired Brick stain and gathered it for the skirt. The flower at her waist is Aged Mahogany, with a faux diamond in the center which of course you can't see at all. The only letters I had were 1/2" and lower case, so I turned to the Cricut and used 1" letters. I like the effect a lot.

I love the adventure of the tags this year and want to continue to use the techniques throughout the new year. I am so thankful for Tim Holtz and all the folks he works with and all the folks in blogland who share their work. It's an amazing adventure we're on!

Wednesday, December 28, 2011

Day 9 - Double Embossing

Or how yellow makes Festive Berries look orange...

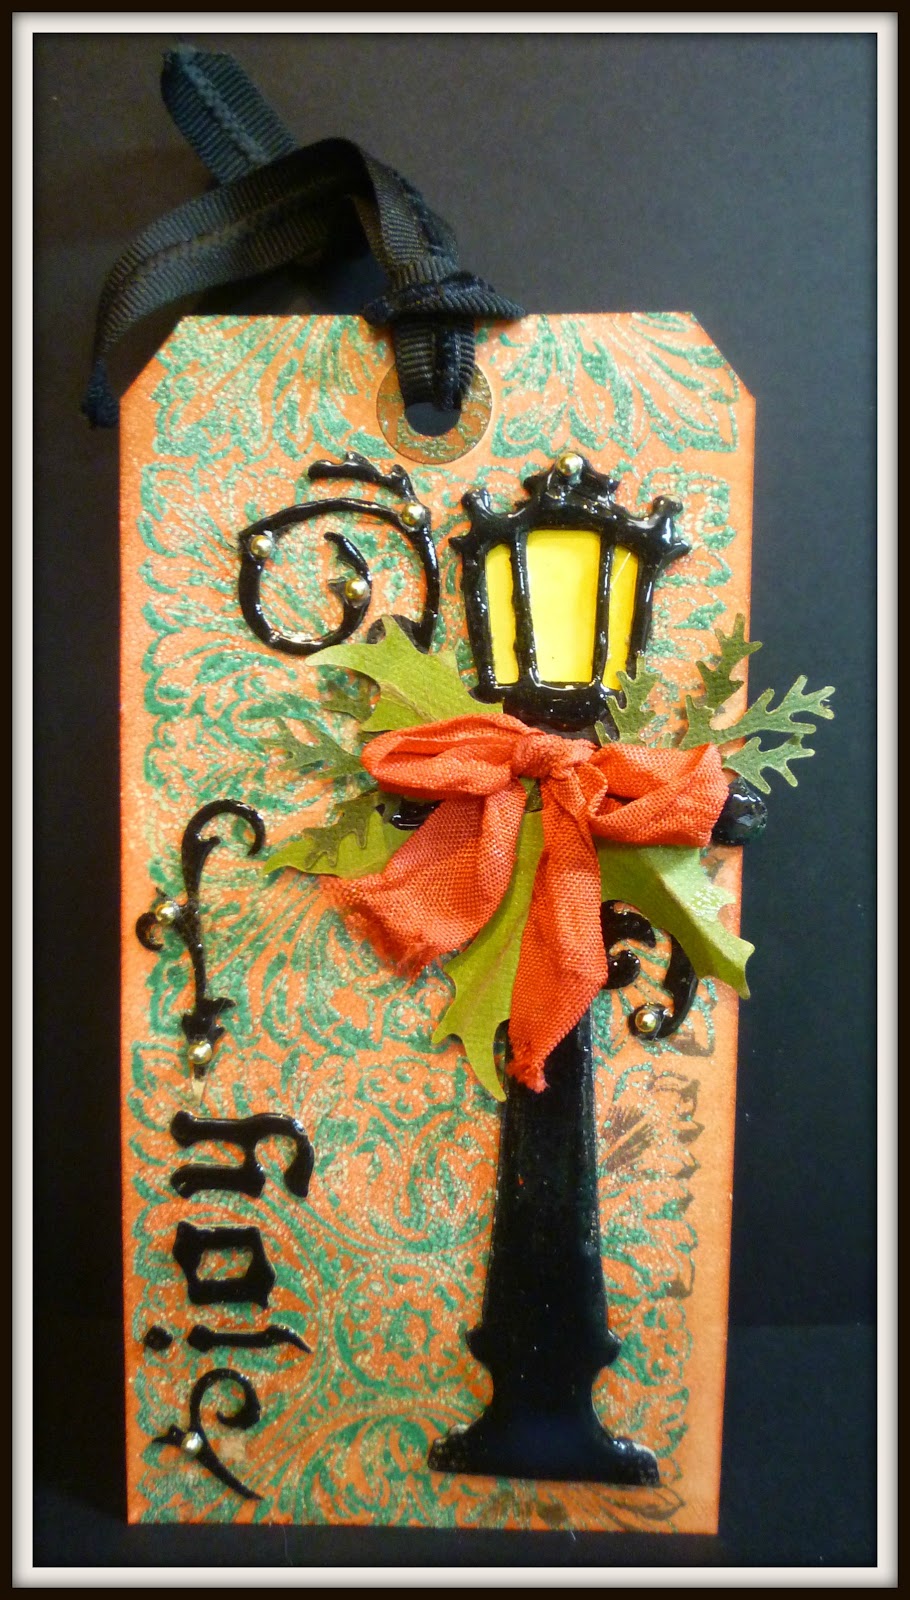
Doesn't matter though, I still like the way this one turned out. Of course I didn't have the Hero Arts background stamp Tim used, but I did have a beautiful Anna Griffin tile stamp I used for the background. I used Evergreen Bough as the first ink color, which I then embossed with clear powder. Very shiny. Next I inked the entire card with Festive Berries and embossed it again. I might have over baked it, because I got some little white bumps, but I didn't let that stop me. Walnut stain and Tim's distressing tool finished the edges. Note: if you don't have the distressing tool, consider the investment...it does a fabulous job.

I got the idea of the yellow light in the street lamp from Annette Green - thank you very much Annette. (Check out her blog - she made Christmas ornaments out of the tags - WOW). It's just some yellow alcohol inks on glossy paper. I think I used a combination of Lemonade and, and, well, some other shade of yellow.....


Each year in Palmer, Alaska we celebrate Colony Christmas, a great old fashioned festival in mid-December. A couple of years ago we hatched the idea of using evergreen boughs, white lights and big red ribbons on all the street lights which look very similar to this die cut. It looked great. And our lamp posts are shiny, so I made mine shiny too with Glossy Accents.

And to finish it off I found some small gold embellishments that were just perfect. Hmmmm. I love the Fun Room.

Sunday, December 11, 2011

Day 5 - Christmas in Paris

Ooo la la. Like this technique a lot! I didn't have the Christmas script, and truth be told I hadn't been really successful with the stamp I did have...but I had only tried stamp to stamp. But using the reverse stamp on the beautifully colored clear tag produced a gorgeous background.

I used Red Pepper, Watermelon, and Current alcohol inks - three different applications. And the process worked just like Tim (link)said it would. I think I was actually giggling when the ink removed the color and just left the french sentences.


I was sitting in a meeting earlier this week when I came up with the idea of the Eiffel Tower and after auditioning red, white, and green I settled on the black background The greenery is from the pine cone die - in about as many different colors of green as you can imagine. Got that from my quilting days: if you use enough they all blend together.

I am a real fan of Tammy Tutterow (link) and so one day ordered the little hero arts alphabet she uses so effectively. I have to say I love it. It's just the right size and I can use it to say any ole' thing that pops into my head. The simple red "pearl" (yeah, right, a string of them for $2.90 at Michael's) was all the embellishment it needed. Enjoyed this tag a lot....I love Paris. 

Wednesday, December 7, 2011

Tag, What Tag?

Oh boy - this is amazing. I am loving the suspense of waiting for the tags each day and then there is so much information! Tim Rocks. No doubt about it.

But it's been a really busy week at work and I only have a bit of time to work on them; hopefully I have enough done and drying to have at least two more done tomorrow.

The big decision now: Tim will post the new one in a half hour (Alaska time is one hour earlier than Arizona, so I get them every night at 11:01 pm). Should I wait up?

One night I woke up in the middle of the night and thought, oh, what the heck, took a look and got so excited I was up for another 3:00 hours. Not so good for the energy level the next day. But, as my co-worker said this morning it only happens once a year.

Okay - I'm going to bed and getting up early tomorrow....unless of course I still happen to be awake at 11:01

Sunday, December 4, 2011

Day 1 - Tim Holt'z 12 Days of Christmas

For the past five years, Tim Holtz  (link) has created a tag the first twelve days of December. I guess there are many reasons he does this, but the ones I focus on are the new techniques he incorporates AND the call to be creative during what can be, well let's just say a rather hectic time of year.

So here's my first days tag:


I didn't have all the supplies, like the die-cut for the snazzy Noel he had, or all the right foliage under the pine cones, so I used an old grunge board ornament and the leaves from the pine cone dies....I was SO excited that my pine cones even resemble pine cones -- thanks to a the video on Tim's site which suggests you start from the outside - BIG difference.

And because "if one's good, ten are even better" sentiment passed along by my Dad, I actually made two of these types of tags. Yippee Skippy.


Here's a close up of the pine cones I'm so proud of.....


So maybe tomorrow I can actually figure out how to list the great blogs I follow, and post my cards on some other websites which is why I'm doing this in the first place - although truth be told, I have been thinking about.